Friday, March 7, 2014

Shrimp and Broccoli in Garlic Sauce and Fried Rice


What do you do when your favorite Chinese Restaurant changes owners and the food becomes substandard? Well it happened to me, and I love my made-for-American-Chinese-food (I'm from Brooklyn for God's sake!). Now that the lady that used to be there with the cute kid who always invited us to return is gone, I have been highly disappointed with the local Chinese restaurant where I live. The food is old, the shrimp are translucent, and the fried rice is not fresh and every grain for itself like the last owner did it. It's like if you go to a soul food restaurant, and the macaroni and cheese is Velveeta shells and cheese or something. The last owner seemed like she was from NYC. I really miss her, but I can't take any more chances...so, I recreated my favorite dish as my father used to do when we were kids. He loves Asian cuisine and so does the rest of my family. My father always said that we were eating American food because Chinese people didn't believe that we would like their traditional food, so they cooked dishes that we would buy. He prefers "real" Chinese food, and I like some of it too, but I really love the stuff that they created just for Americans (if that's really the case). I wouldn't try to sell it, but it is enough to satisfy your craving, if you have a few packets of duck sauce and soy sauce for the rice.

So, check out my Shrimp and Broccoli recipe (I actually did the research):


Ingredients:
 
1-2 heads of fresh broccoli
1/2 of a knob -1 knob of garlic
1/2 onion (whatever kind you have)
3 tablespoons soy sauce
1 tablespoon cornstarch or flour
1 cup water
sesame/olive oil
fresh shrimp (peeled and deveined)
carrot  (optional)
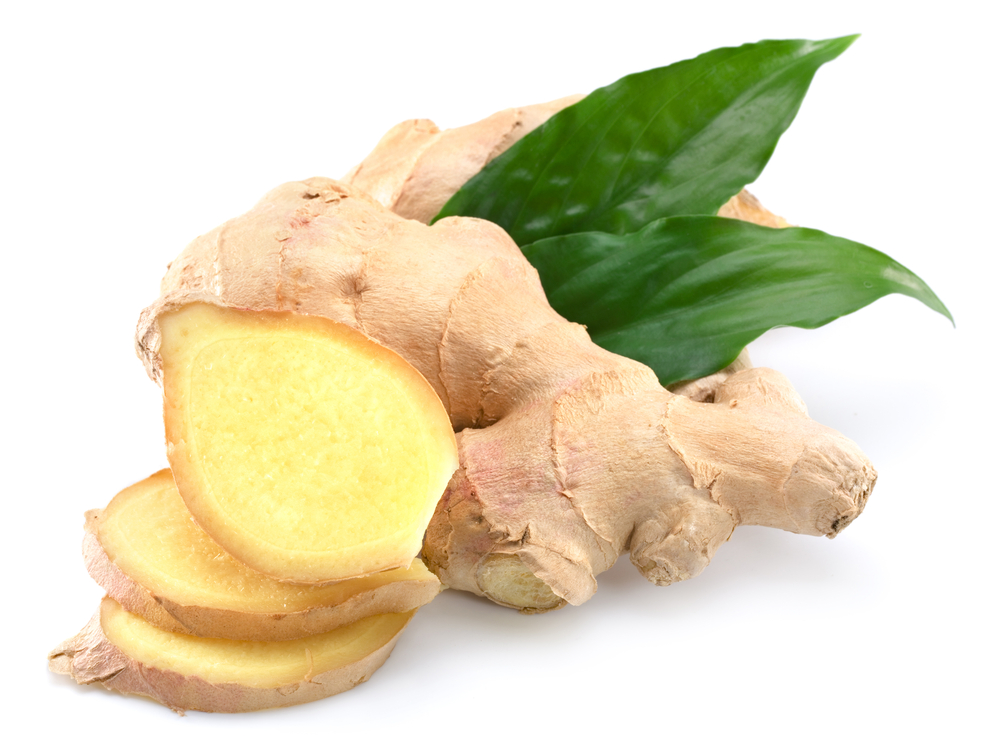
Sliced Ginger (peeled with potato peeler or diced)
crushed red pepper or scotch bonnet pepper (optional)
(for the feel of real fried rice add scrambled eggs, bean sprouts, peas, carrots, but I always order fried rice no vegetables).
 
Jasmine rice or Uncle Ben's
Five spice powder (optional)
 
peel and devein shrimp and rinse in cool water
 
dice onion and garlic
 
cut broccoli stalks at the tip and then cut without damaging heads too much
 
Before you get started make sure that your oil is hot because you're going to stir fry stuff quickly and remove it based on brightness of color.
 
 take a table spoon or so of oil and fry onions and garlic in the pan until onions become translucent (after oil becomes very hot add onions and garlic and fry on medium).

Add shrimp and a table spoon more of oil and soy sauce and sauté until shrimp are bright pink, but remove right away and set aside.

Add broccoli 1 tablespoon of soy sauce and sauté until bright green, remove broccoli immediately and set aside. Add oil as needed, but not too much. Make sure the garlic doesn't burn, you can add 1/2 the garlic in the beginning and the other 1/2 at this point, if you'd like.

There should be liquid in the pan from water released within the broccoli and the shrimp...make sure you don't remove this with the shrimp or the broccoli when you remove them from the pan.


Take the corn starch or flour and add small drops of water (like a teaspoon at a time and mix up a slurry of the starch/flour). Slowly add more water to this (to reach about 1/2 -1 cup), and make sure you're whipping it with a fork or you can beat it with an electric appliance. You just want to make sure that there are no lumps because you don't want a lumpy sauce. Chinese people like cornstarch according to Google China using Google translate.

 Add this to the pan and 1 more table spoon of soy sauce (I think that's the 3rd and last one). and stir it up with a fork. Add the ginger and let this simmer down and thicken before you add the shrimp and then the broccoli (add last to avoid over cooking). Taste the sauce and salt and pepper to taste, but remember that soy sauce is salty, and you should have seasoned your shrimp with salt and pepper ahead of time.


Rice:

Boiling Rice:

When I boil rice, sometimes I stir fry the dry grains in some olive oil in the bottom of the pan before I add water (Turkish rice trick), and I only add the water just enough to cover my hand, if I lay it flat on top of the rice in the pan. I turn the heat to high and I let the rice and water come to a boil, uncovered.

When it boils, I cover it with a top slightly tipped, and I turn the water to medium, allowing it to boil off the water, and when the water is gone, I cover the lid tightly and turn the heat to medium lo. The rice at this point is just steaming in what little water is left, and I am careful to prevent the rice from burning on the bottom. Use a fork to fluff it when checking for readiness.

Frying Rice:


When you fry rice, make the rice ahead and put it in the fridge or use old rice that was stored in the freezer. Fried rice is what you do to save old rice.

So, if you didn't have rice for dinner the night before, make the rice and put it in the freezer, so it comes out right when you fry it.

The key to fried rice- fry the ingredients separate from the rice and then add everything together at the end and give it one last stir.


 Add a table spoon of oil or butter to a hot pan (wok preferably with this and everything else for this recipe), and sauté the onions, garlic, diced carrots, and whatever other vegetables you may want in rice.

Set this aside after about 60 seconds of stirring.

Crack an egg in the pan and immediately begin to sauté back and forth (not for too long, just to scramble it softly). Set the softly cooked egg aside and prepare to fry the rice with soy sauce and butter/oil in the pan.

Sautee the rice back and forth until golden brown and remove and set aside. Add the vegetables to the pan and sauté with a dash or two of soy sauce and a pinch of five spice powder if you want. Then add back the rice, once you have the desired consistency of the veggies and eggs. Stir it all together, and you have fried rice.


Homemade Potato Chips and Hashbrowns


You need:
 
Potatoes (any kind)
Oil for frying (I like olive unless deep frying then I use vegetable)
potato peeler
 
If you have a potato peeler and some potatoes, all you have to do is peel your potatoes with the peeler (if you don't like skin) and then start from the top and peel the potato at the tip of on end to make thin circles.

If you want potato chips, leave them as in the pic above and drop them one at a time (very quickly) into the oil (don't overload and they cook very quickly, so be prepared to pull them out and put on paper to dry).

 
After I sliced the potatoes into thin circles, I diced them up to make hash browns.
I also diced up onions and garlic.


Better than Waffle House!
 
Add a few table spoons of olive oil and let it get hot (but don't burn it...go to medium high).
Drop a quarter cup or so of the potatoes and top it with onions and garlic.

Kosher Hebrew National Franks were on sale. All Beef Franks are the best!


I burned a little onion, but it was good anyway.


Eggs scrambled with cheese and veggies, toast, franks, hash browns for breakfast.  


Monday, February 10, 2014

Watermelon-ish Rum Punch


Okay, so the title is a bit misleading, but it's really a good drink. I made some traditional Jamaican Rum Punch for my friend's party, and he happened to be cracking open a watermelon when I brought the punch through the door. My hubby recalled a time that we blended ice and watermelon for cocktails in the past, but I didn't like the foamy pulp layer that floated to the top. So, we decided to slice watermelon and drop it into the drinks as a garnish (to eat at the end of the drink because it will soak up the liquid).
 
Be mindful that I'm giving you gems from my Jamaican father...this punch is a hit at every party, and it sneaks up on you. So, please do be responsible, and never operate a vehicle on this stuff!
 
Here's the recipe:
 
1 Cup of Sour
2 Cups of Sweet
3 Cups of Strong
4 Cups of Weak
 
Essentials: grenadine, allspice/cloves, ginger
 
 
Here's the translation, if you don't speak Jamaican (lol/dwl/boal):
 
1 Cup of Lime or Lemon juice (sour)
 
2 Cups of Sugar (sweet)
 
3 Cups of Wray and Nephew's Over proof Rum (key ingredient- the strong)
 
4 Cups of water (weak)


Grenadine for color and/or flavor (you could also add a packet of red Koolaid, but grenadine is better)
I like the brand below:


ginger


allspice or cloves (below are pics):
 
 
allspice
 
 
cloves
 
 
Oh, and don't forget the watermelon! If you want to leave it out, that's fine. As I said, the title is misleading as I only sliced watermelon sticks and added it to the punch. I often make this drink without the watermelon.

Just dump everything into a large pitcher and shake it up. I cut the ginger in chunks and push it through the opening (because I often use an old water jug or something). I also put the cloves or allspice directly into the container, and when I make the drinks, I pour it through a strainer or I just let the ginger and cloves and allspice seeds into my cup (because it's that good!). However, it always tastes better the next day after all of the flavors have marinated.


Sunday, January 26, 2014

The Art of Making a Bangin' Sandwich!

Cold Turkey- Hot Turkey


Both sandwiches were essentially made the same way, but the hot sandwich was placed in the oven on broil after sprinkling cheese on top. The cold sandwich has a fried cheese (I know it's not healthy, but it's so good).
 
Ingredients:
 
Get a nice French or Italian crusty bread (I bought mine on sale at Harris Teeters)
Thin sliced turkey meat (or whatever you like)
Tomatoes (thinly sliced)
Shredded Lettuce or mixed greens (optional...I didn't use any)
Red Bell Peppers (julienne- optional)
vinegar
olive oil
salt
pepper
oregano or Italian herbs (optional)
Mayonnaise
shredded cheddar cheese (I made fried cheese for the cold sandwich)
 
Chips on the side and pickle (you can make your own quick pickles with cucumber in vinegar and salt solution or you can get pickling lye ahead of time to do the usual water, sugar, salt, lye solution).
 
By the way, julienne is a term that refers to thinly slicing something the long way.


So, I believe that the key to making a sandwich is proper layering of the ingredients, and proper application of wet ingredients to prevent sogginess. This is why I no longer eat at Subway, which has too soft bread that gets soggy after they squirt a pint of vinegar and oil on it!
 
I cut the loaf of bread in half, and spread mayo evenly on either side of the bread. I layer the meat on the bread (I don't like too much meat, but my husband does, so that's up to the individual). Place the tomatoes, thinly sliced on top of the meat, the fried cheese goes on the other half of the bread.
After the tomatoes and other vegetables (if you choose to use them) are placed on the meat, sprinkle salt and pepper on the vegetables and then sprinkle a cap full of vinegar and a cap full of olive oil over the salted and peppered veggies.
 
For the fried cheese (it's an art, and you don't have to do this, if you don't feel like trying):
 
 
I prefer a cast iron pan for this
butter (just a pat)
cheddar cheese (shredded is what I always use)


I heat the pan to medium, and I put the pat of butter in the cast iron pan to melt (be careful not to burn it).

 
I spread it around in the pan.

 
Once it gets like this, I turn the heat to high for like 10 seconds, and then I turn the pan off completely. Then I start to scrape at the edges with a spoon.

 
I kind of peel it up at one edge with the spoon, and I keep a plate close by to transfer it quickly and to allow it to cool. Be careful not to scrunch it up while it's still too hot.


 You can see that this is greasy and probably not very healthy, but it's so delicious. So, I call anything that I put fried cheese on a "heart attack waiting to happen".
 
My Pickles:
I bought terrible pickles from the $1 store, and I emptied the liquid and replaced it with vinegar, salt, pepper and garlic.
 
Homemade chips:
Potato (sliced thin with a potato peeler)
Oil for frying
slice potatoes using a potato peeler to make chip slices
Allow oil to get hot (medium high)
flash fry the sliced potatoes in hot oil, by placing the slices carefully in the oil (try not to clump them on top of one another, and try to quickly drop a slice or two at a time, being careful not to burn the chips).


The cold sandwich is depicted above, and you can place the fried cheese on the half that is opposite the meat and veggies. Close your sandwich, cut it in half and place it on a plate with some chips or fries, and now you're ready to eat!


For the hot sandwich in the picture above, just sprinkle shredded cheese on top and place in the oven on broil only long enough to allow the cheese to melt (so watch it because depending on your broiler, this could happen in a minute).

Sunday, January 5, 2014

Fresh Falafel From Scratch!


Seth's Recipe                                                  

1 bag dried chick peas (garbanzo beans/chana, whatever you call them)
3-4 cloves of garlic diced
1 onion (medium sized) diced
1 cup chopped parsley
1 tbspn fresh mint chopped
1 tbspn fresh greek oregano chopped
2-3 tablespoons of flour (or cornstarch, but only 1 tablespoon)
1/4 tspn baking soda
1/4 tspn baking powder
1/2 tspn cumin
1/4 tspn turmeric
1 tspn paprika
1 tbspn olive oil


Soak chic peas overnight, and drain them. Use a blender to ground the chickpeas with the herbs, spices and the 3-4 cloves of garlic, 1 whole onion (medium sized). You can blend the onion and garlic down to a pulp prior to mixing it with the chic peas or you can blend all of the ingredients together, whatever works for the food processor or blender you have.

Some people even grind the peas to a flour and create falafel that way, but my husband does his this way.
Add the baking powder, baking soda, flour or cornstarch to the mix. You only want enough to make it bind/stick, but you don't want to get a mouth full of breading, so mind the amount of flour you use. It's best to ensure that you don't lose the chic pea taste. Drizzle the olive oil over the mixture, and stir the mixture well. Cover it and allow it to set in the fridge.


(allow the mixture to settle in the fridge for as long as you want, but at least 30 min to an hour for the flour and baking soda to properly absorb all the liquid in the mixture and come together as a homogenous mass).


Frying the falafel


Rub your hands with olive oil, or whatever oil you have so that you can shape the balls in perfect spheres. Some people use a special tool or a melon ball scoop or something. So, you can get creative. However, this is how  my husband does it.

Put them all on a plate like you see in the pictures below. The oil should be getting warm in the pan while you're doing this, but be careful not to burn it, and don't put too much oil because you don't want the oil to flow over the sides of the pan when you add the falafel to the oil. Or you can use a deep fryer...we even have one, but we never use it.

Fry the falafel until they are golden brown on the outside, and you don't want to put the oil on high heat, but you want to put it on medium, so the falafel doesn't cook too fast on the outside and not enough on the inside.


The fine recipe is in the picture above. However, I prefer the course recipe depicted in the picture below. Also, there is jajuk, which is a yogurt sauce/cold soup recipe that I like better than tzaziki.
 

Wednesday, January 1, 2014

Fresh Baked Bread for the New Year!

Seth's Fresh Baked Bread


1 C. water (for yeast blooming and dissolving sugar)
2-3 tablespoons of sugar
2 packets of rapid rise active dry yeast
4-6 C. Flour (all purpose flour)


Instructions

1 C warm water dissolve about 2-3 tablespoons of sugar (food for the yeast) in it and add 2 packets of rapid rise active dry yeast. Allow the yeast to bloom- the liquid gets a puffy top layer (you should be able to tell that your yeast is good and working by this feature).

Use 4-6 cups of flour (you can start with 4 and add as needed for the right consistency...this is my husband's recipe and he doesn't do a lot of measuring, it's like a memory that he has from his mother).


Add the flour to the mixing bowl and add the liquid to the flour and mix until the liquid is completely incorporated into the flour. Then obtain another cup of warm water and add a little at a time until the dough is a one homogenous mixture. You don't want the dough to stick to the pan, but you want it to stick to itself.


Flour your hands and take the dough out and knead it out on a floured workspace until it's not tacky anymore (your hand shouldn't stick to the dough anymore as much). Knead the dough to awake the gluten in the flour, the longer you knead it, the chewier your bread will be.

Lightly coat the pan or bowl that you're using and the dough with oil. Olive oil contributes better flavor, but vegetable and other oils work fine too. Put the oiled ball of dough in the oiled pan or bowl and allow it to rise until it has at least doubled in size. Take the ball of dough out and knead again on a floured surface.

Shape your bread by rolling it out on the floured surface and roll/fold the edges toward the middle. So, there is an edge that is closest to you and one opposite that (farther from you). Fold them in towards one another to meet in the middle of the dough. the two edges that have not been folded yet will be folded into the others. Here is a diagram to help visualize the process:


The pocket to get air bubbles in the bread is to prevent making a really dense bread. Now the dough can be rolled into a snake like shape (not too long), and then tuck the ends in. Let the dough rise again (at least doubling in size).

 Remember that the dough rise more as it bakes, so don't make it too big.

Place the dough on a flat baking pan or bread pan. Then cut slits in the top of the dough to allow steam to escape from the bread.

Bake the bread at 375 until golden brown. When you thump it with your finger, it should sound hollow and not dense.


Here's how it looks after you pull it out of the oven. I apologize for the lack of pictures for some of the key steps as I was not present for the entire process, but I'll do another bread blog post later with the corrections.